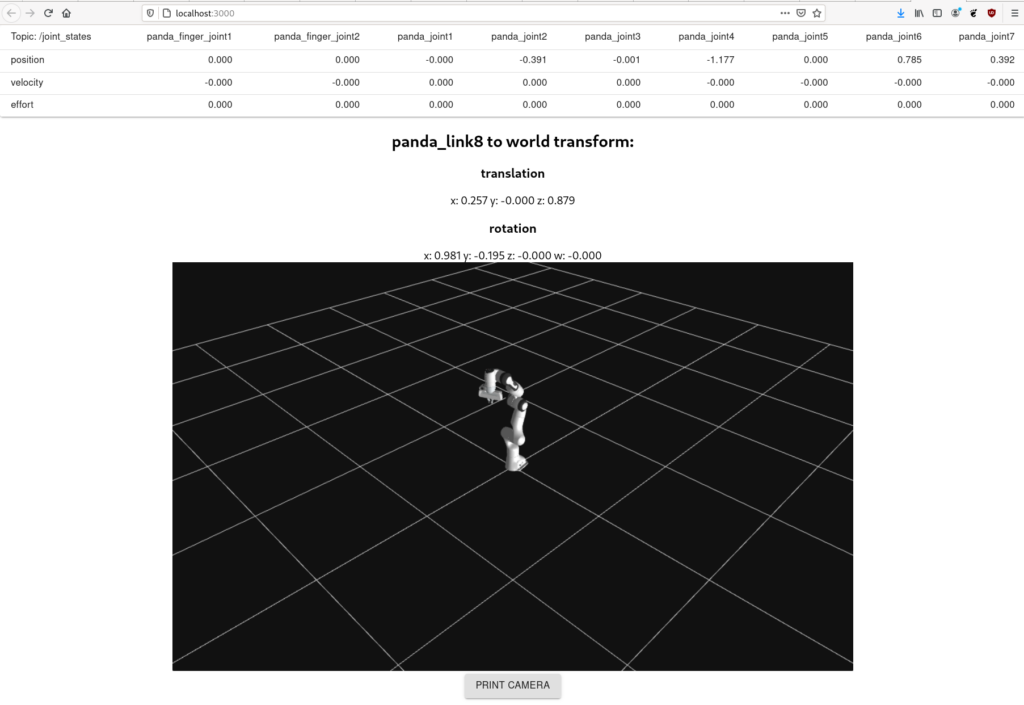
In this blog post we are going to construct a minimalist web interface that shows information about the robot’s current state in numbers and shows it in an embedded 3d visualizer:
Our intention in this post is to set-up the fundamental components that are needed to communicate with the ROS master from a modern web app. It is not intended to be used as finished work but it should instead provide the basic structure needed for building a modern web interface for the panda robot as it can be improved in numerous ways.
We will need the following building blocks for this web interface:
- The existing panda_simulation package
- A new ReactJS package for the frontend
- A docker container that server panda’s visual model files to front end
Preparation & Setup
We will assume that panda_simulation is already installed in the workspace catkin_ws and continue with the installation of the other components. We need NodeJS, ReactJS, and Yarn for this tutorial. Since there is an unresolved package conflict when using apt to install the node package manager npm we will install these components from the NodeSource distribution release:
cd ~/catkin_ws # this is the root workspace dir. Change if necessary
curl -fsSL https://deb.nodesource.com/setup_12.x | sudo -E bash -
sudo apt-get install -y nodejs
curl -sL https://dl.yarnpkg.com/debian/pubkey.gpg | sudo apt-key add -
echo "deb https://dl.yarnpkg.com/debian/ stable main" | sudo tee /etc/apt/sources.list.d/yarn.list
sudo apt-get update && apt-get install yarn
cd /catkin_ws/src/panda_simulation/
yarn global add create-react-app
create-react-app panda_web
cd panda_web/
yarn add @material-ui/core ros3d roslib lodash
yarn start
With the above commands we have created the sub-folder panda_web in our source directory panda_simulation with the script create-react-app. It quickly bootstraps a ready-to-use ReactJS application in the specified folder. After installing the dependencies that are needed for this project we can start the web interface with yarn start and it will open a new tab in the browser:
Now we need to switch to our initial panda_simulation package in order to add the components that will allow our frontend to access information from the ros core. The following changes need to be applied:
<!-- package.xml -->
<depend>rosbridge_library</depend>
<depend>rosbridge_server</depend>
<depend>rosbridge_msgs</depend>
<depend>rosapi</depend>
<depend>tf2_web_republisher</depend>
# CMakeLists.txt
find_package(catkin REQUIRED
COMPONENTS …
rosbridge_library
rosbridge_server
rosbridge_msgs
rosapi
tf2_web_republisher)<!-- launch/simulation.launch -->
<!-- for web interface -->
<include file="$(find rosbridge_server)/launch/rosbridge_websocket.launch">
<arg name="port" value="9090" />
</include>
<node pkg="tf2_web_republisher" type="tf2_web_republisher" name="tf2_web_republisher" />Now run the following commands to install these dependencies and then run the simulation:
cd ~/catkin_ws
rosdep install --from-paths src --ignore-src -y --skip-keys libfranka --skip-keys moveit_perception
source devel/setup.bash
roslaunch panda_simulation simulation.launch # gui:=false optionally without GUI if you're running in a docker container
I would like to quickly mention that I have put the necessary scripts for the visualization into the panda_simulation/panda_web/public/scripts directory and these scripts are loaded automatically within the public/index.html file:
<head>
...
<script src="%PUBLIC_URL%/scripts/three.js"></script>
<script src="%PUBLIC_URL%/scripts/ColladaLoader.js"></script>
<script src="%PUBLIC_URL%/scripts/STLLoader.js"></script>
<script src="%PUBLIC_URL%/scripts/eventemitter2.min.js"></script>
<script src="%PUBLIC_URL%/scripts/custom/ColladaLoader.js"></script>
</head>
There is one more thing that needs to be done before we can visualize the robot. The model files that represent the robot’s links are located in the franka_ros package and need to be served to the front-end somehow. There are many ways to do this but we are going to run a docker container for this purpose. This has the advantage for the developers that they can just build and start and for the package maintainer this is an advantage as the model files are separated from the panda_web project directory. I have added a Dockerfile to the project under panda_simulation/docker/franka_ros_files which downloads the franka_ros repository into the serving directory of an nginx container:
FROM nginx

# Modify default conf for CORS access and auto file listing
COPY default.conf /etc/nginx/conf.d/default.conf

#install necessary packages
RUN apt-get update && apt-get install wget unzip -q -y

# download and unzip repository to html serving dir
WORKDIR /tmp
RUN wget -O franka_ros.zip https://github.com/frankaemika/franka_ros/archive/0.6.0.zip

WORKDIR /usr/share/nginx/html
RUN unzip /tmp/franka_ros.zip
RUN mv franka_ros-0.6.0/* .
We are going to build and run this image:
cd ~/catkins_ws
cd src/panda_simulation/docker/franka_ros_files
docker build -t franka_ros_files .
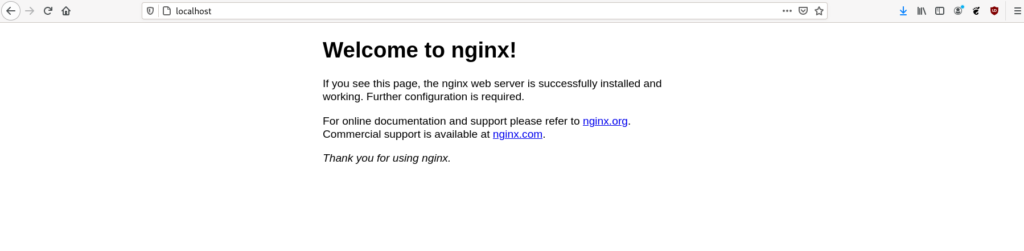
docker run -p 80:80 franka_ros_filesYou can check if the files are served by accessing localhost with the browser:

Structure of the ReactJS App
Now that the basic setup is finished we can modify add the necessary functionality to the bootstrapped ReactJS app. Our app will consist of three different components:
- Views
- Components
- Services
- Configuration files
Views
This will be a single-view application as it will only be a proof-of-concept. Our view is called DashboardView.js and it is contained in the root of the application – the file App.js. DashboardView renders three components:
import React from 'react';
import { JointStates } from '../components/JointStates';
import { TransformClient } from '../components/TransformClient';
import { ModelVisualizer } from '../components/ModelVisualizer';
import { panda_simulation } from '../utils/constants';

export default class DashboardView extends React.Component {
     constructor(props) {
         super(props);
         this.state = {};
    }

    render() {
        return (
        <div>
            <JointStates topic={panda_simulation.constants.JOINT_STATES_TOPIC} />
            <TransformClient
                     targetFrame={panda_simulation.constants.WORLD_LINK}
                     sourceFrame={panda_simulation.constants.PANDA_EE_PARENT_LINK}
                     tfRate={10}
                 />
            <ModelVisualizer
                     urdfPath={
                         'http://' + process.env.REACT_APP_FILE_SERVER_URL + ':' + process.env.REACT_APP_FILE_SERVER_PORT
                     }
                     targetFrame={panda_simulation.constants.ROBOT_BASE_LINK}
                     tfRate={panda_simulation.config.tfRate}
                     width={panda_simulation.config.width}
                     height={panda_simulation.config.height}
                     cameraPosition={panda_simulation.config.cameraPosition}
                 />
        </div>
        );
    }
}
Components
We have three custom components that each have a different purpose:
- JointStates: Retrieves the joint states of the robot from the given topic and displays the results in a table
- TransformClient: Retrieves the transform information between to given frames and displays them as text paragraph
- ModelVisualizer: Visualizes the current state of the robot
All components have in common that they continuously retrieve data about the robot’s current state from the ROS master that we started earlier. This is achieved with the service component that will be introduced in the next section.
Services
Currently the only service that is implemented is the RosService.js. It communicates with the ROS master at the address that is provided in the .env config file:
var ROSLIB = require('roslib');
var ROS3D = require('ros3d');

var ros = new ROSLIB.Ros({
     url: 'ws://' + process.env.REACT_APP_ROS_BRIDGE_URL + ':' + process.env.REACT_APP_ROS_BRIDGE_PORT
 });

ros.on('connection', function () {
     console.log('Connected to websocket server.');
 });

ros.on('error', function (error) {
     console.log('Error connecting to websocket server: ', error);
 });

ros.on('close', function () {
     console.log('Connection to websocket server closed.');
 });

// ... implement different ROS client functionality

module.exports = {
     JointStatesListener,
     tfClientToFrame,
     viewer3d,
     markerClient,
     markerArrayClient,
     urdfClient
 };
The crucial line here is line 4 where a new connection is established with the ROS master. The address is extracted from the .env file that is located in the panda_web/ directory:
REACT_APP_ROS_BRIDGE_URL=localhost
REACT_APP_ROS_BRIDGE_PORT=9090
REACT_APP_FILE_SERVER_URL=localhost
REACT_APP_FILE_SERVER_PORT=80
Port 80 was specified above when we issued the docker run command with the -p flag. Port 9090 was specified in the simulation.launch file within the panda_simulation/ directory.
The custom ROS package as well as the modified franka_ros repository that is needed for the simulation are available in my GitHub profile.